
DIY Coastal Birthday Backdrop
If you’re looking for the perfect way to add beachy charm to a birthday party, you’ll love this DIY Coastal Birthday Backdrop. I’ve been holding onto my 3 panel tri-fold wooden backdrop display for over a year, and I finally got a chance to put it to good use!
Like many teens, my daughter is obsessed with The Summer I Turned Pretty. She’s always loves beachy decor, so I thought this was the perfect time to create a coastal-inspired display for her special day. While I used to go all out for parties (I’ll link to several from previous years below!), now that the girls are older, they seem to prefer a more subtle vibe, and this backdrop was just enough to make us both happy. =)
Supplies You’ll Need
Here’s what I used to create this DIY Coastal Birthday Backdrop: For your convenience, some of the links in this post are affiliate links.
- 3-Panel Wooden Arch Backdrop Stand
- Printed vinyl (for covering the backdrop)
- Squeegee or Credit Card for smoother application.
- Scissors or Craft Knife to trim excess vinyl.
- 8mm Jute Rope
- Netting – I really love decorating with this netting, it’s so versatile! You can reuse it by tossing across a table, under your serving dishes, over the corner of a mirror, etc.
- Starfish Beaded Garland – I feel like this is optional…it’s gorgeous, but I don’t think it would be a big deal to not use this, BUT my daughter loves it and plans to use it in her room.
- Cardboard tubes – I recycled the inserts from my vinyl material (Check with a local sign shop, they may be happy to give you their extras!)
- Glue gun & glue sticks – I love having a two-temp glue gun, but it does get HOT. I started this project with a low-temp glue gun, but quickly found my other because it works faster. I also love using a silicone mat with hot glue projects.
- Scissors / Paper Cutter / Rotary Cutter + Mat
- Free Printable Happy Birthday Bunting – or use the included Canva template to customize with your own colors, fonts, and even photos!
How to Make Your Coastal Birthday Backdrop
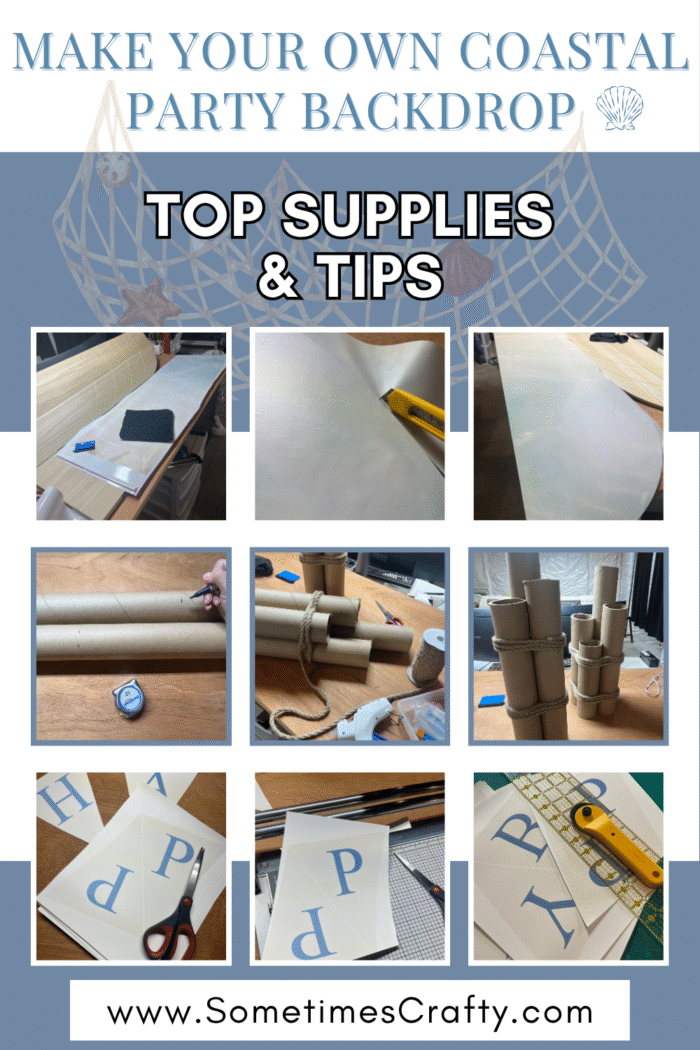
Step 1: Prepare Your Backdrop
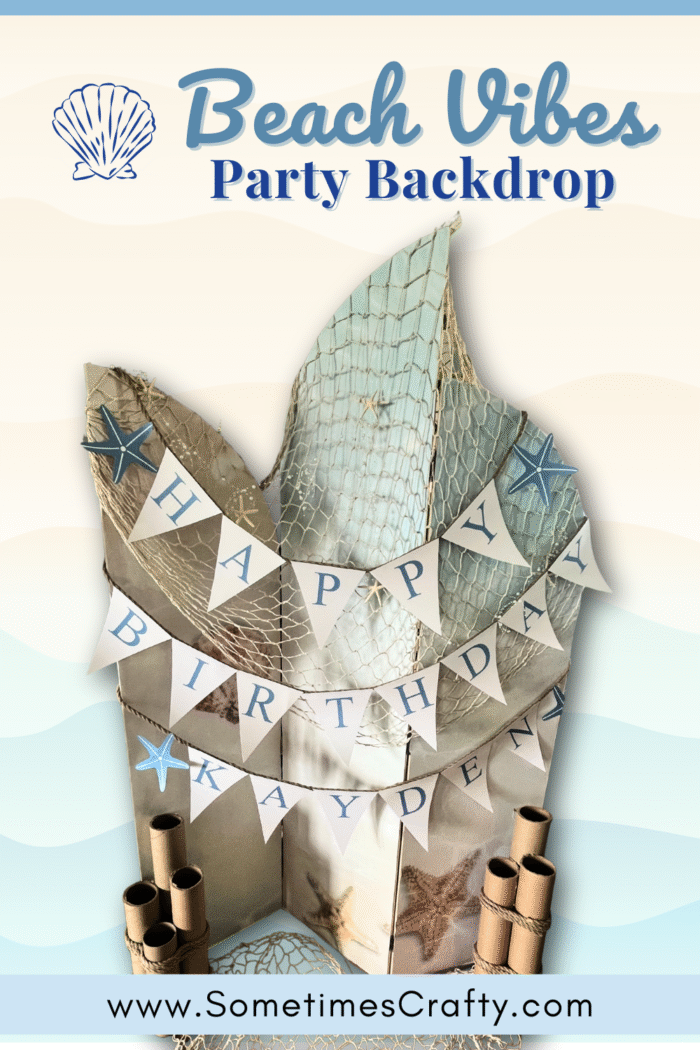
I started by covering my tri-fold wooden backdrop with printed vinyl to create a soft, sandy ocean vibe. You could also paint it if you prefer.
Step 2: Add Netting and Garland
Drape netting across the panels for a beachy fisherman’s net effect. I did not need to use anything to hold it in place. The garland and starfish are easy to carefully tuck into the netting.
Step 3: Create the Cardboard Tube Stacks
To mimic dock posts or beach pilings, cut cardboard tubes to varying heights and wrap them with rope. I used hot glue to secure the tubes in a cluster first, then wrapped the rope, using more glue to secure it.
Step 4: Print, Cut, and Hang the Bunting Banner
Use the printable bunting banner template to create a personalized touch. I printed mine on white cardstock, cut them out, and hot glued each piece to the rope to match the natural tones of the display.
For cutting the individual bunting pieces I tried 3 methods – scissors, paper cutter, and rotary cutter. I found the rotary to be the quickest and easiest method (for everything except the starfish, for which I used my scissors) so if you have those tools, use them!
Honestly, this bunting truly was the icing on the cake, so to speak. I couldn’t decide what sort of sign or banner I wanted to use until the last minute. I started cutting big sheets of cardboard to make a faux wooden beach type sign, but wasn’t loving it. I was down to the wire and kind of felt like, “Ugh. Fine, I’ll just do a paper bunting banner.” I wasn’t thrilled. HOWEVER, once it was done I absolutely loved it! I was feeling rather “mid” (as the kids say) about the whole project until I put the banner up and suddenly it came to life!
More Party Inspiration
If you love decorating for parties like I do, check out these past favorites:
- Tropical / Moana Summer Birthday
- Frozen Birthday Party
- Doc McStuffins Birthday
- Daniel Tiger Birthday Party
FAQ About This DIY Backdrop
What size is the backdrop display?
The Hobby Lobby tri-fold wooden backdrop measures approximately 72″ H x 53″ W x 7″ D. It’s relatively lightweight yet sturdy for decorating.
Can I use fabric or paint instead of vinyl?
Yes! Use what you have or what you like to cover the backdrop.
How do you hang the bunting banner securely?
It’s not super pretty from the back, but I used some small pieces of Duct tape to hold the rope in place. If I were making a display for more than a day or two I’d probably staple the rope on the back.
Pin It for Later!
Don’t forget to save this project for your next celebration:
*Ready to make your own? Grab the FREE Printable Bunting Banner + Canva Template and start creating your dream coastal party decor today! *
Leave a Reply