
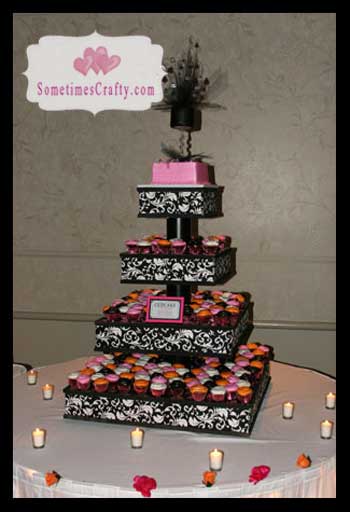
DIY Cupcake Stand
PLEASE NOTE: Despite many requests we no longer sell finished cupcake stands. They are quite heavy and expensive to ship so we were unable to offer them at an economical price for most brides. As an alternative you will find basic info below on how to make your own or we do have step-by-step instructions (with photos!) for a smaller stand available through Candyland Studio.
Also, please respect our original design as this is NOT meant for commercial use.

This bad boy is roughly 3′ tall when finished and holds approximately 200-220 regular sized cupcakes, depending on if you want a cake on the top layer.
Tracey, a reader who used our tutorial, was nice enough to provide me with a metric version! You can obtain those instructions here. Thanks Tracy!
Materials List
49″ x 97″ x 3/4″ MDF Board (1 sheet)
Cut to size:
32″ x 32″ (2 pieces)
24″ x 24″ (2 pieces)
17″ x 17″ (2 pieces)
12″ x 12″ (2 pieces)
4″ x 2′ PVC (2 pieces)
4″ PVC Coupling (4 each)
1/2″ 6′ All Thread Rod (1 piece)
1/2″ Hex Nuts (2 each)
Paint
1/2″ Flat Washer (2 pieces)
6-8 Knobs (to put on the bottom for feet)
2 yards of 44″ or wider fabric
32″ x 40″ Foam Board (1 piece)
Cut to size:
23 1/8″ x 4 1/8″ (2 pieces)
16 1/8″ x 4 1/8″ (2 pieces)
11 1/8″ x 4 1/8″ (2 pieces)
*NOTE: You will need to cut 2 pieces of foam core slightly smaller than the dimensions above so they all fit snug.
Have your local hardware store cut the MDF board, then cut a small circle in the center of each piece. Put the threaded rod through layers of the MDF board and PVC; when you tighten the nuts at the top and the bottom it will create a sandwich effect that keeps the structure nice and tight.

(Notice that you don’t have to paint the top and bottom of everything, only parts that will show. Countersink a hole in the top so the threaded rod does not stick out. You can add a nice piece of acrylic, or another board or something on top if you wish but it’s not necessary.

We routered the undersides of the layers so we could slip the panels in and out. You can skip the routering if you don’t intend to change the fabric panels.

Lay out the foam board and cut the fabric a couple inches larger. Wrap the fabric around the panels and adhere with a strong glue. Let dry, then slide into the routered grooves.

Add the knobs at the bottom for feet and you’re ready to go! Keep in mind this thing is somewhat heavy, and large:

You will definitely need a truck to transport it fully assembled. But, it’s easy enough to tear apart and reassemble if necessary.
Please send me photos if you make one and we’ll feature it on our site!!


Love this and will be starting to make one soon for our wedding. I was just wondering if there is something else instead of foam board that you can use? It’s pretty expensive here; about $50/sheet.
Hi Dana!
So glad you like the stand. Are you sure you’re looking at the right kind of foam board?? That seems AWFUL expensive; you can usually get sheets here for less than $5 per sheet (I think 24″ x 30″?) at any craft store. Foamboard was the most inexpensive and lightweight option I could think of but really, you can use any material you like so long as the thickness coincides with the groove you route in the base boards.
Is there a way to take off a layer when you don’t have an event that big? Like a baby shower? I like this stand and will use at weddings and other big events. But I would like some tips to make it to accomodate both small and big events.
Hi Nina.
This design is not really made to be interchangeable like that. I suppose you could make a counter sink hole in each of the top piece layers and cut multiple threaded rods in different heights. The hole would be hidden when you add more layers on top so that might work, but it’s not something was have investigated in depth. I would love to see photos if you try something like that. Good luck!
I definitely will!
So, I have been talking to someone about building this stand. If you take some thicker pieces and drill holes big enough for a lollipop stick it can also be a cake pop stand. its doable. I hope… =)
Now THAT is an AWESOME idea!!! I would really love to see photos of that, too!!
Thank you for sharing your wonderful cupcake stand. It was exactly what I needed. I had this built for my mother’s 60th birthday party and it was the talk of her event. I’d love to share a picture of it with you.
Yay! That makes me soooo happy!!! =) PLEASE do send me a picture, I would LOVE to see it!! Please send to: laura (at) sometimescrafty (dot) com. THANK YOU!!!
Hi! This looks great! How big was the cake that was on top of the stand? Just wondering how big of a cake can fit on there! Thanks!!
Thank you!! The top layer should hold up to a 12″ cake. I think ours was 10″ maybe??
THIS IS COOL!!! Just wondering…what are the cylinder shaped white and black pieces in the photo? Are they the 4 4″ pvs couplings and 2 (seems like 3 in the photo) 4×2″ pvs painted black?
Thanks! And yes, the cylinder shaped pieces are the PVC sections…the black ones have been painted. The PVC pieces are layered between the MDF pieces for support and to help “sandwich” it all together. Hope that helps!
What is the best way to paint the wood and pvc?
We tried a few different paints – spray paint, water based, oil based – and we felt that the oil based latex paints worked the best for us. We eventually bought a spray gun but that’s not necessary if you don’t have one. You could use foam or bristle brushes to apply the paint.
We also used an oil based primer before painting. Hope that helps!
Where did you buy the foam board from?
I usually buy it at Hobby Lobby but if you don’t have a Hobby Lobby near you, you should be able to find it at most any craft store. Here’s a link so you can see what you’re looking for: http://amzn.to/17N31Kq
Hi Laura! I absolutely love what you have created and have had my eye on it for a couple of years now. I have a wedding to do in two weeks and I plan to tackle this in the next day or so. I am just a little confused about threading the rod into the MDF boards. Do you take one long rod and thread all the way through from top to bottom? So I assume you would set up the boards and pvc pipe between each layer, then slide the rod down through the predrilled holes? I am sorry, but I am a visual person and it doesn’t show that step! Thank you inadvance!
Yep! You sort of layer everything with the rod going through each layer. I’d do it layer by layer…probably easier than stacking the MDF and PVC and trying to put the rod all the way through it all. =) Good luck!
Thank you so much!
You’re welcome! =)
Hi!! I love this stand and plan on making this weekend. However, I am unable to find the directions/tutorial from the website linked in your post. Any help please?
Hello! I’m so sorry, the tutorial was inactive in my shop…here’s a direct link: http://www.artfire.com/ext/shop/product_view/1579925
I love this cup cake stand!! However, i’m a little confused about the PVC pieces. I know you said 2 pieces of 4″ x2′ and 4″ couplings. It looks like we’re needing 3 pieces of PVC ….is this right? And is 4″x2′ correct or are they meant to be cut down…sorry for all the questions…thank you so much for your help!
It’s been a long time since I’ve made one of these, so I don’t remember the specifics off the top of my head. (Sorry!) But, I remember you do cut down the PVC pieces as needed. =)